
Cryptocurrencies are a revolutionary change to the global financial system. They are a decentralized currency, i.e., not backed by any government or centralized body. Instead, they rely on a peer-to-peer publicly distributed ledger network called blockchain technology.
Since their introduction, cryptocurrencies have caused a seismic shift in the world’s economy by cutting off the inefficiencies and irregularities of fiat currencies.
Unfortunately, creating a new cryptocurrency without proficiency in Solidity, Rust, and other web3 programming languages may seem daunting.
However, the advancement of blockchain technology has given rise to many no-code cryptocurrency tools that allow anyone to create cryptocurrency without a single line of code.
Therefore, whether you have any idea of cryptocurrencies or want to make changes to the ever-evolving future of decentralized finance – this guide will take you through how to create a cryptocurrency with some of the most user-friendly protocols and tools.
Let’s delve into the exciting realm of decentralized innovation.
What is Cryptocurrency?
Simply, cryptocurrency is an open and decentralized digital currency that serves as a medium of exchange.
Technically, they are data strings created with various digital architectures to represent a currency unit. However, unlike real-world currency, they work with cryptography and are not tangible.
The high adoption of cryptocurrency is basically due to its numerous advantages, especially its highly secure nature.
It uses end-to-end encryption to store, secure, validate, and transmit data with blockchain technology.
Apart from its decentralization and security, other benefits of cryptocurrency are as follows:
- Anonymity and privacy
- Transparency
- Portability
- Accessibility
- Light speed transaction time
- Low fee transactions
How Does Cryptocurrency Work?
Most of the benefits of cryptocurrency come from blockchain technology. It is a public ledger that allows anyone to view transactions and records, thereby enhancing transparency.
Although transactions are recorded on a public ledger, they are secured by powerful encryptions to prevent fraud and double-spending.
When transactions are initiated with cryptocurrencies, your cryptographic keys, consisting of private and public keys, represent your identity on a blockchain. They are useful for authentication, encryption, and decryption during transactions.
Blockchain is decentralized and, therefore, gives control and maintenance power to its users. However, a commonly agreed term for controlling and maintaining activities of a network is achieved by CONSENSUS MECHANISM.
There are two major types of consensus mechanisms: proof of work and proof of stake. Proof of work is also called MINING.
In PoW, validators verify crypto transactions by solving complex mathematical puzzles based on their computational power. Once they solve the puzzle, they show the rest of the network to confirm its accuracy, then add the transaction to a block.
However, in proof of stake, validators stake their coin in order to participate in adding or attesting transactions and blocks. Staking means dedicating their asset or locking their coin.
Things to Consider Before Creating Your Cryptocurrency
Cryptocurrencies and blockchain technology are considered the future of the global financial system. Hence, many people are intrigued by the idea of creating their own cryptocurrency.
Still, many people shy away from the idea due to the perceived overwhelming technical complexity of the process. However, the introduction of user-friendly cryptocurrency-creating platforms and tools has made it relatively seamless for anyone with zero technical skill to create a cryptocurrency without writing any code.
Meanwhile, the legal and regulatory consideration for owning and trading crypto assets differs by country and geo-political zone.
Therefore, before delving into the specifics, it is important to have a basic knowledge of cryptocurrency and the regulatory rules around creating and trading cryptocurrencies in your region.
Additionally, it is imperative to carefully plan and map out ways to ensure sustainable development for your cryptocurrency.
Aside from this, here are some preliminary things to note before creating your cryptocurrency:
Plan Token Utility and Tokenomics
A key step to creating a sustainable DeFi ecosystem is defining the token’s features, purpose, and utility.
In other words, you have to define if your cryptocurrency will be used for peer-to-peer payments, a utility for an ecosystem, a means for crowdfunding, etc.
Tokenomics is also an important aspect of planning a cryptocurrency. You have to plan how much supply you’d like to have – taking basic economic rules into consideration.
Remember, the higher the supply, the lower the price. Also, outline any important characteristics, distribution, and tokenomics of the token.
Customize Token Parameters
Another prerequisite to creating a cryptocurrency is choosing all token parameters, including name, ticker, trading features like burn features, deflationary/inflationary mechanism, minting, and other relevant token specifics.
Choose Your Preferred Blockchain Network
Blockchain networks differ in their scalability, efficiency, and features. Therefore, it is important to familiarize yourself with each blockchain network, its features, efficiency, and scalability.
For instance, trading cryptocurrencies on the Ethereum mainnet is generally less efficient compared to first-generation Proof-of-Stake chains and layer-two networks.
Once all these are in place, you can explore user-friendly and intuitive token generators available across various chains.
Steps to Create Cryptocurrency With Cointool
Cointool is an all-in-one decentralized token toolbox and dApp. Its token generator allows anyone to create and deploy contracts for customized tokens on any network. An important feature of Cointool is its multichain support for over 40 layer one and layer two networks.
To create a token with Cointool, ensure you set up your Metamask wallet and fund your preferred blockchain’s native token from any CEX.
Here’s a step-by-step guide to creating a cryptocurrency with Cointool:
- Connect wallet to Cointool
- Input token details
- Customize token features
- Deploy token
Connect wallet to Cointool
To start creating your cryptocurrency on Cointool, navigate to the cointool.app on your web browser.

From the homepage, click the CONNECT WALLET button from the top right corner. Approve the wallet connect prompt that appears in your wallet.

After connecting your wallet, scroll down to the CREATE TOKEN section and select your preferred blockchain network. This will be the network that your token contract will be deployed on.
Input token details

Once you’ve chosen a blockchain network, the next thing is to input token details. This includes your preferred token name and symbol (ticker). The ticker is usually three to five characters long.
Proceed by specifying the total token supply and token decimals. The token decimal refers to the number of digits that can come after the decimal when displaying the value of a token. It can range from 1 to 18.
Customize token features
After specifying the details of the token, you can also customize token features and other tokenomics. These include functions like:
- Can Burn: This adds a special deflationary mechanism to the token by specifying whether the token can be burned to reduce supply.
- Can Mint: This inflationary feature specifies if additional tokens can be created to increase supply.
- Can Pause: This feature gives the token owner the power to pause and halt token operations as needed. This can be used to pause transfers in case of wallet exploits and hacks.
- Blacklist: The blacklist function allows the token creator or owner to blacklist wallet addresses to prevent them from accessing and trading the token.
- Deflation: Deflation works like burning. The difference is that the deflation feature can be used for other purposes, including rewarding loyal holders and charity. While burning is useful to regulate total/circulating supply, Deflation is useful to regulate non-circulating supply.
- To set deflation or super deflation, fill the transaction tax and tax receive address field. Specify the burn fee and also indicate if there’ll be a holder reward fee.
Deploy token

Once you’re done, click on CREATE TOKEN. Before your request is approved on Cointool, the smart contract is audited.
So you do not have to worry about audit and contract security. Complete the transaction in your wallet after paying the required gas fee.
Token creation takes seconds. Once completed, the token is automatically transferred to the creator/owner’s address, and that’s all! You can add liquidity afterward.
Steps to Create Cryptocurrency With Bitbond
Bitbond is a top blockchain protocol that provides enterprise-grade tokenization technology.
The protocol provides a wide range of DeFi services, including lending, no code token creation, stablecoin issuance, and implementation of digital asset custody.
One of Bitbond’s ingenious features is its ingenious token generator platform for anyone to create cryptocurrencies on several blockchain networks. To create a token with Bitbond:
- Connect wallet to Bitbond
- Select blockchain network
- Input token details
- Set token parameters
- Deploy Contract
Connect wallet to Bitbond

The first step to creating a new cryptocurrency with Bitbond is going to tokentool.bitbond.com. On the homepage, click on CONNECT WALLET from the top right corner of the homepage.
Select available wallet options and approve the connection prompt in your wallet.
Select blockchain network

Once you’re in, select CREATE TOKEN from the options in the left-side menu bar.

To start creating your token, select the blockchain network you’d like to create your tokens on.
Meanwhile, ensure your wallet is connected to the network you’d like your assets issued. For instance, if you want to create an ERC20 token, you must switch your wallet to the Ethereum chain.
If you see a warning message notifying you that your selected network does not match your wallet network, you need to review and switch your network.
Input token details
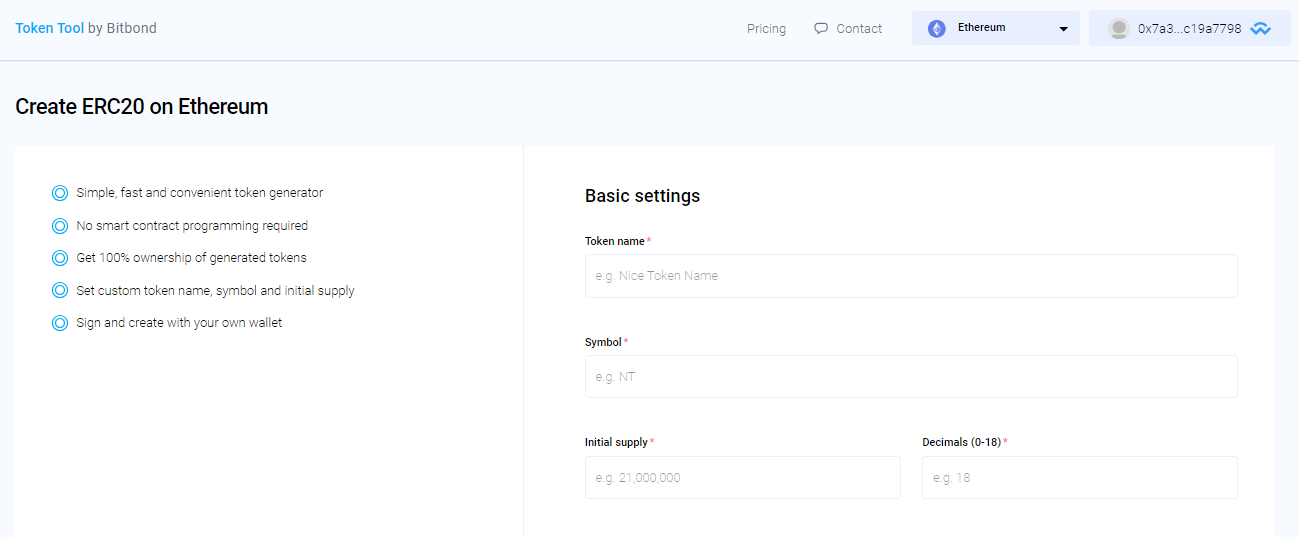
Continue by inputting important details about your token. This includes the token names and symbol (ticker).
Specify the token supply and input the decimal (from 1 to 18).
Set token parameters

Bitbond’s token configuration is almost similar to that of Cointool. The only difference is – Bitbond comes with an advanced token security configuration.
The basic features you can add to your token include:
- Can Burn
- Can Mint
- Can Pause
- Can Blacklist
- Charge Transaction Tax/Fee
- Apply Burn Fee (Deflation)
- Change Owner: This feature allows the creator to deploy a token on a different address.

The advanced security configurations are set in place to increase overall asset security. However, activating some of these features incurs higher token creation fees.
Also, this can make your token incompatible with some DeFi protocols. Therefore, you must review each setting before using them. These include:
- Has Document: An extra information that can be a hash or URL used for referral purposes.
- Max number of tokens per address is limited: This feature limits the token allocation of each holder’s address. Limits can be increased or decreased after the token has been created.
- Requires Whitelisting: This specifies if token access and trading require whitelisting.
- Can be Force Transferred: This feature enables the token creator/owner to forcefully transfer assets without the holder’s signature or approval.
Deploy Contract

After going through the features and specifying each configuration, scroll down and click the CREATE TOKEN button.
Meanwhile, ensure you review all the token information before deploying the token.
Agree to the platform’s Terms and Conditions from the window that pops up by clicking ORDER WITH OBLIGATIONS TO PAY.
Sign the transaction prompt that pops up in your wallet to approve the token deployment.
Once the transaction has been completed on-chain, the tokens will automatically be created on the blockchain network.
Afterward, a pop-up showing your contract address, block Explorer link, contract ID, and other important information about your contract will be shown.

You can now manage your token from the Bitbond dashboard. If you want to add your token to Metamask, click ADD TO METAMASK.
Steps to Create Cryptocurrency With Guarda Token Generator
Guarda is a popular multiplatform non-custodial wallet provider and multipurpose DeFi tool. It features a user-friendly interface for crypto enthusiasts, traders, and investors to store their private keys and crypto assets.
Guarda features a token creator that allows Guarda users to create fully functional and security-audited tokens on Ethereum and Hedera. Guarda’s token generator has a specially built-in smart contract for anyone to generate a token without coding.
Here’s a step-by-step guide for creating a token with Guarda:
- Set up Guarda wallet
- Complete token information
- Deploy token contract
Set up Guarda wallet

Before using the Guarda token generator, you must set up a Guarda wallet. Guarda wallet is available on every device as a web-based wallet.
To begin setting up, navigate to www.guarda.com on your web browser. On the homepage, click CREATE WALLET to set up a new wallet.

On the next page, set up a secure wallet password and confirm it. Ensure you write down the password somewhere.
Wait for Guarda to automatically generate your multi-chain wallet. Then, download your wallet backup by clicking on DOWNLOAD BACKUP.
Ensure you keep your backup file saved as it contains your seed recovery phrase. With the recovery phrase, you can regain access to your Guarda wallet if you lose access to it.

After setting up your wallet, you can fund it with the native token of the blockchain you want to create your cryptocurrency. This will serve as gas fee when completing various transactions while creating your wallet.
To top up your wallet, select ETH or HBAR from the token menu in the left hand side of theGuarda wallet dashboard. Copy the deposit address and transfer enough tokens to it.
Complete token information

After setting up your wallet, go to Guarda token generator at https://guarda.co/app/token-generator on your web browser.
On the home screen, input your wallet password to unlock your Guarda wallet and connect it to the platform.
Continue by choosing the preferred blockchain network between Ethereum and Hedera Hashgraph (HBAR).

Then, input the token name and symbol. Next, set up the token supply and set decimals from the advanced settings.
Deploy token contract

At the final stage, you must have enough tokens in your wallet to cover the service charge and network fees.
If your available token is insufficient, you will be redirected to your Guarda web wallet, where you can top up your wallet.
Conclusion
Cryptocurrencies have proven to be an excellent alternative to traditional banking systems. They provide a faster, cheaper, safer, and universal way to perform financial transactions. On top of that, they give you unparalleled control over your wealth.
While creating a cryptocurrency may seem daunting to those without coding skills, user-friendly tools and platforms have made it accessible to anyone.
By planning token utility, customizing token parameters, and choosing the right blockchain network, individuals can easily create cryptocurrencies by following the explicit steps highlighted in the guide and turning their ideas into a decentralized reality.
Related Posts: