
If you want to interact with the Polygon network, you will need to use a compatible crypto wallet like MetaMask. But, as you probably know by now, MetaMask doesn’t work with Polygon right out of the box. You need to configure it first.
Thankfully, adding the Polygon network to your MetaMask wallet is simple, and this guide will show you how to do it in just five easy steps. If you haven’t created a MetaMask wallet yet, don’t worry, we will cover that as well.
What is MetaMask?
MetaMask is a popular crypto software self-custodial wallet that you can install as a browser extension or mobile app. While it was primarily built for the Ethereum network, it also supports layer 2 solutions such as Arbitrum and Polygon.
At the time of writing, MetaMask supports five major browsers, including Chrome, Firefox, Brave, Edge, and Opera. But if you choose to install it as an app, instead, you can do so on Android and iOS devices.
What is Polygon?
Polygon (MATIC) is a layer 2 network built for the Ethereum blockchain. Its primary goal is to fix Ethereum’s scalability problems by processing transactions on a separate blockchain network.
Once a transaction is processed, Polygon returns it back to Ethereum. This approach reduces Ethereum’s network load while keeping the transaction speed high and transaction costs low.
Thanks to Polygon, developers can build projects on the Ethereum network without experiencing its well-known scalability issues. Furthermore, regular users no longer have to put up with network congestion issues.
Steps to Create a MetaMask Wallet
Creating a MetaMask wallet can differ slightly depending on the browser and device that you choose to install it on. In this example, we will use the Chrome browser extension on a Windows 11 desktop computer.
Just follow our eight-step guide, and you will set it up in no time.
1. Go to the official website
Open the metamask.io website and click the blue Download button on the upper right to open the extension’s download page.

2. Open the extension
Click the blue Install MetaMask for Chrome button at the bottom to open the Chrome extension store.

3. Install the extension
Click the blue Add to Chrome button on the right to install the MetaMask extension on your browser.

4. Set up the extension
Click the blue Get Started button at the bottom to start setting up your MetaMask extension.

5. Create a new wallet
The MetaMask extension will now present you with two options. You can either import an existing wallet using a secret recovery phrase or set up a new one.
This guide was written for new MetaMask wallets, so click the blue Create a Wallet button on the lower right.

6. Set a password
You can now set a password for your new MetaMask wallet. After you enter it twice, you can read and accept the terms of use if you want to proceed. Finally, click the white checkbox and the blue Create button at the bottom to proceed.

7. Back up the recovery passphrase
The MetaMask extension will now provide you with a twelve-word recovery passphrase. Click the white lock in the center of the blurred image to reveal it. Make sure to store it somewhere safe, as you will have to provide it in the next step.

8. Confirm the recovery passphrase
Confirm the previously generated passphrase by clicking on the corresponding phrase blocks in the correct order.

That’s it. You now have your very own MetaMask wallet. So read on to learn how you can use it to access the Polygon network.
Note: If you want to secure your passphrase, read the following tips.
- Don’t share it with others.
- Store it in at least two places to avoid losing access.
- When needed, create a new backup via Settings > Security.
- Don’t fall for phishing scams (MetaMask won’t email you asking for your passphrase).
Steps to Add Polygon to MetaMask
The MetaMask wallet extension was designed for Ethereum, and that’s why it will be configured for the Ethereum mainnet the first time that you run it. But it also works with Ethereum’s layer 2 solutions like Polygon.
In the following guide, you will learn how to add the Polygon network to your MetaMask extension in five easy steps.
1. Open the extension
Open MetaMask by clicking the extension’s fox icon in the upper right corner of your browser. Then click on the Ethereum Mainnet dropdown menu at the top.

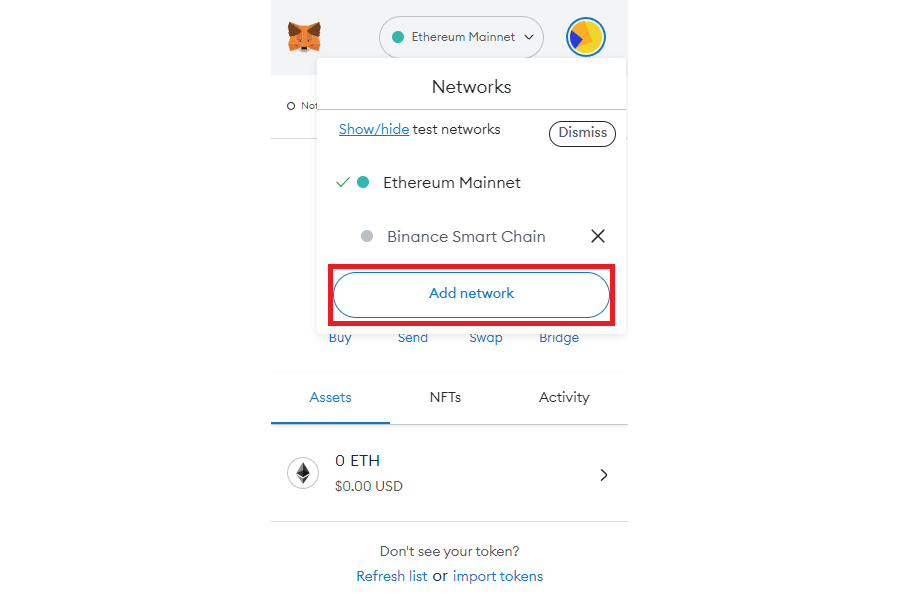
2. List the networks
Click the blue Add Network button at the bottom to list the available Ethereum layer 2 solutions.
3. Add Polygon
Click the blue Add button on the right of Polygon Mainnet to proceed.

4. Confirm your action
Click the blue Approve button at the bottom right to proceed.

5. Switch to Polygon
Click the blue Switch to Polygon Mainnet button in the middle to set Polygon as the active network for your MetaMask wallet.

That’s it. You’ve now completed setting up Polygon as your MetaMask wallet’s main network.
Final Words
Using the Polygon network, you can build projects on Ethereum without experiencing its scalability issues or having to deal with network congestion.
But in order to start interacting with the Polygon network, you first need a compatible crypto wallet. MetaMask is the perfect software wallet solution to access Polygon.
Just follow our guides in this article, and you will easily create a MetaMask wallet and make it work with the Polygon network.
Related articles:
How to Add Metamask to CoinTracker?